RS3 Sync Help Center

Offline-friendly documentation

RS3 Sync Help Center

RS3 Sync links Race Studio 3 telemetry with onboard video so you can review laps in context. This help layout is designed to be easy to expand with new pages, screenshots and videos over time.

Important: RS3 Sync relies on the SessT (Session Time) channel in Race Studio 3. That channel is not enabled by default, so setup in RS3 is required before syncing will work.

Welcome

RS3 Sync is built for racers and coaches who already use Race Studio 3 and want a practical way to review telemetry and onboard video together, without needing a dedicated camera ecosystem.

No special camera required

Use the video you already record from GoPro, DJI, Insta360 or similar cameras.

Trial-first workflow

Install the app, try it with your own files, then activate later if it suits your setup.

Designed for RS3 users

RS3 Sync sits beside Race Studio 3 and follows a workflow that feels familiar.
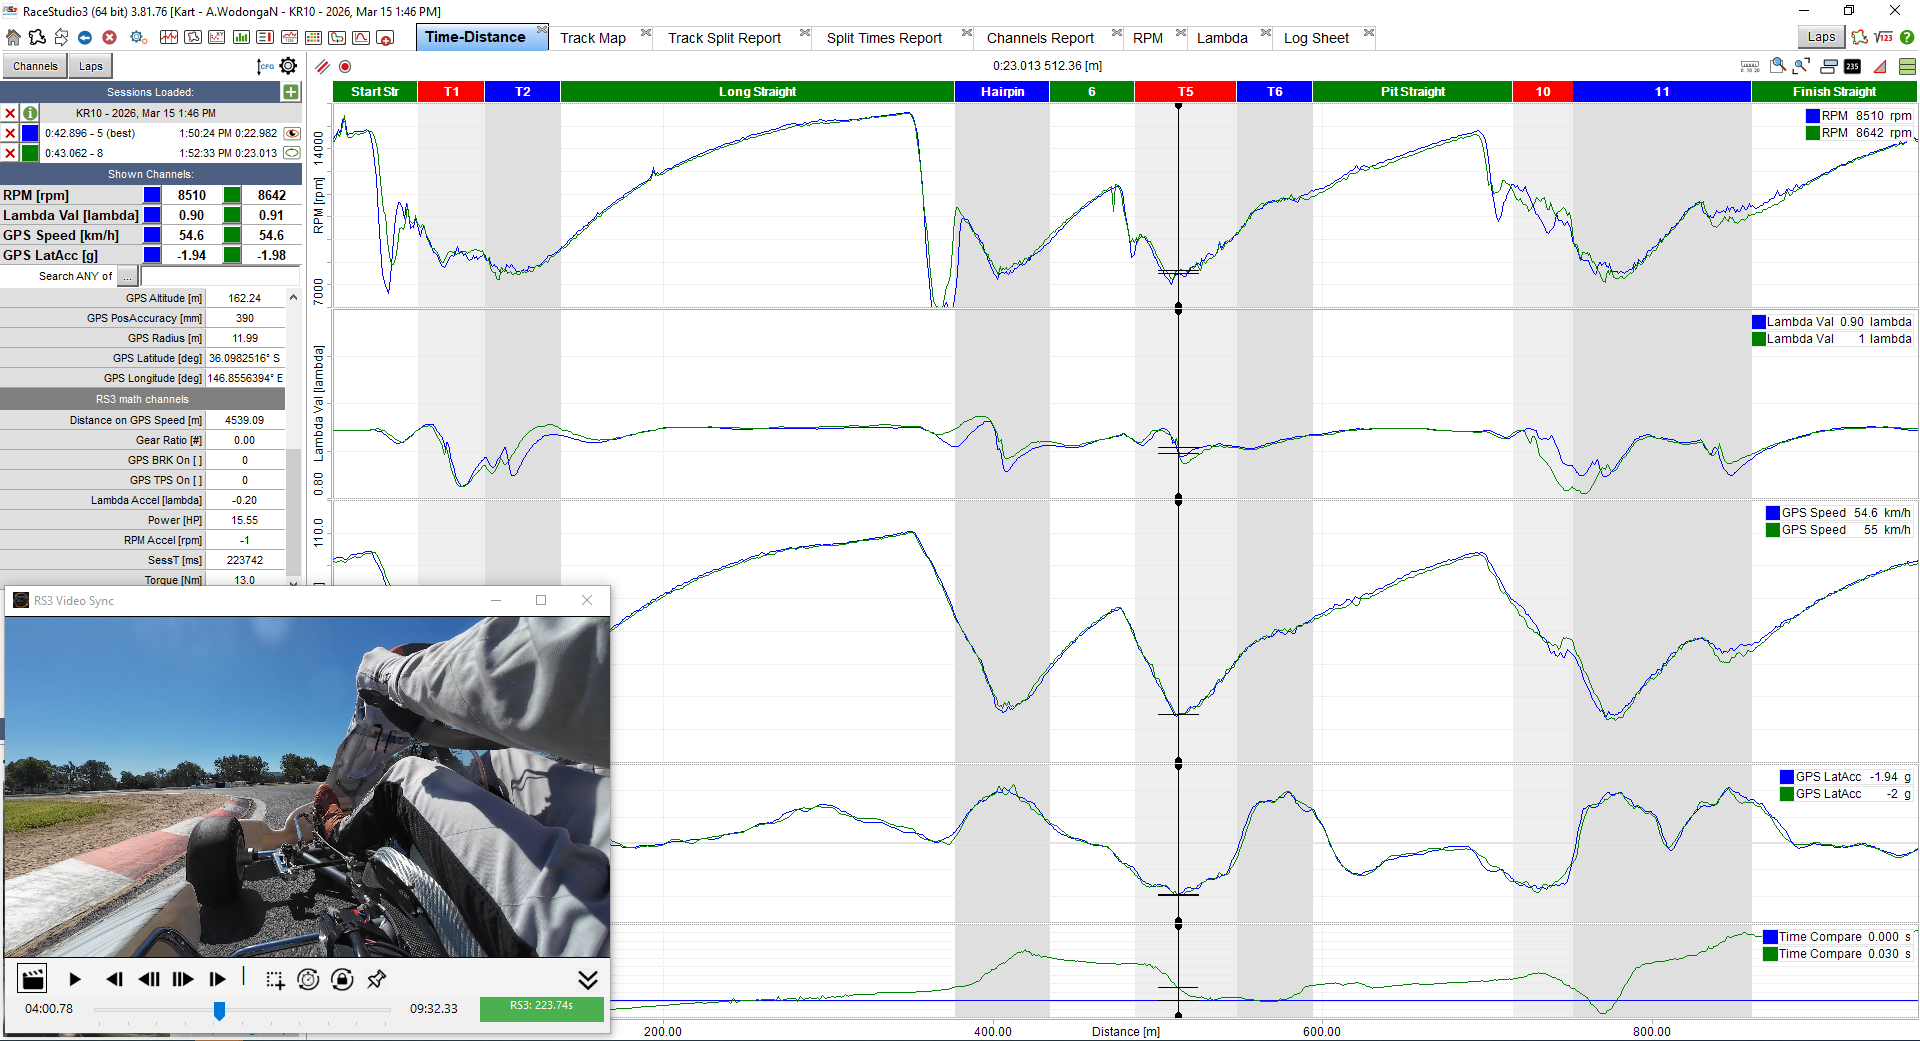
What RS3 Sync does

The app reads the visible session time from your Race Studio 3 screen, then moves the video to the matching point. Once the sync offset is set, you can scrub around the lap in RS3 and see the corresponding onboard footage immediately.

Best first step: Read Required RS3 Setup before trying to sync anything.

Required RS3 Setup

RS3 Sync relies on the SessT (Session Time) channel to synchronise video with telemetry. This channel is not enabled by default in Race Studio 3.

If SessT is not enabled, RS3 Sync will not be able to sync.

Enable the SessT channel

  1. Open Race Studio 3.
  2. Click the Math Channels Settings icon in the top right corner of the Race Studio 3 window.
  3. In the Math Channels Library, locate GPS SessT.
  4. Click the settings icon to the right of GPS SessT.
  5. Select Enable 'SessT' for All Sessions.
  6. Click Exit.
  7. Restart Race Studio 3.

After setup

  • SessT should now be visible in the channels window.
  • Display the SessT value clearly on screen before choosing the OCR region in RS3 Sync.
  • For best OCR results, light text on a dark background usually works best.

Quick Start

1

Enable SessT in RS3

Complete the Race Studio 3 setup first so the session time is available to read.

2

Open your RS3 session

Load the session you want to analyse and make sure SessT is visible on screen.

3

Load your video

Open the matching onboard video file inside RS3 Sync.

4

Set the sync point

Match both to the same moment, then click Set Sync Position.

Basic workflow

Once the sync point is saved, you can scrub the RS3 cursor through the session and the video will follow. This makes it much easier to connect braking, throttle and line choice to what the data is showing.

First-time setup checklist

  • ✔ SessT enabled in RS3
  • ✔ SessT visible on screen
  • ✔ The screen region to scan is set correctly
  • ✔ Video loaded
  • ✔ Sync point set

Loading a Video

Use the app's video open function to load your onboard footage. MP4 is the most typical workflow.

  • Choose the video file that matches the RS3 session you want to review.
  • Trim long videos beforehand if you want faster loading and easier handling.
  • For the best experience, use a video with a stable frame rate and a clear view of the lap.

Recommended workflow

First load the RS3 session, then load the matching video, then scrub both to the same reference point before setting sync.

Selecting the Time Region

RS3 Sync reads the visible SessT value directly from the Race Studio 3 screen. The selected region must contain the SessT time value. The smaller the selected region the better RS3 Sync will perform.

Good selection

  • Tight around the SessT value
  • High contrast text
  • No extra labels or nearby controls

Avoid

  • Large regions with extra UI
  • Low contrast backgrounds
  • Selections that include other changing numbers

Why this matters

The cleaner the region, the more stable the OCR result. Better OCR usually means smoother and more reliable syncing.

RS3 Sync screenshot showing OCR region selection

Setting the Sync Point

The sync point is the moment where the visible RS3 session time and the video position represent the same event.

  1. Move the RS3 cursor to a known reference point.
  2. Scrub the video to that exact same moment.
  3. Click Set Sync Position.

Good reference points

  • Crossing the start/finish line
  • A distinctive curb strike
  • A visible steering or braking event that is easy to identify

Tip: Use a point that is visually obvious in the video and easy to locate in the telemetry timeline.

Playback & Analysis

After sync is set, RS3 Sync follows the session time shown in Race Studio 3. Move the RS3 cursor and the video should move with it.

What this lets you analyse

  • Brake release timing
  • Throttle pickup and hesitation
  • Line choice and curb usage
  • Hands and steering rate compared to speed and G force

Typical workflow

Pause frequently, move the data cursor in RS3, then compare what the footage shows at the same point. This is often much more useful than watching video and data separately.

Controls & Shortcuts

These are the core controls currently expected in RS3 Sync.

Key / Control Action
Space Play / Pause
H Hide / Show controls
F1 Open help (recommended future shortcut)

Keyboard shortcuts generally work best when the RS3 Sync window has focus.

Trial Limitations

The trial version is limited to the first few minutes of session data. Outside the allowed range, syncing stops and the app may show a trial limit indication.

  • This is expected trial behaviour.
  • The full version removes this restriction.
  • It is still worth using the trial to confirm the app works well with your own workflow.

Troubleshooting

Video not syncing

  • Confirm SessT is enabled in Race Studio 3.
  • Confirm SessT is visible in the channels window or on screen.
  • Re-set the sync point and make sure both are aligned to the same moment.
  • If RS3 Sync cannot read SessT correctly, the app will show as not synced (the green indicator will not be active).

OCR unstable or incorrect

  • Choose a tighter OCR region.
  • Reduce extra UI elements inside the selected area.
  • Use a higher contrast display layout if possible.

Playback feels jerky

  • Make sure Race Studio 3 is actually running and visible.
  • Avoid minimising RS3 while trying to sync.
  • Check that the selected OCR region still matches the visible SessT field.

Shortcuts not working

  • Click inside the RS3 Sync window first.
  • Check whether the hidden controls state affects focus in your current build.

Analysis Tips

Use one clear sync reference

Choose a consistent marker like start/finish or a specific corner event.

Keep SessT easy to read

A clear, stable time display makes the OCR more reliable and the app easier to use.

Compare driver actions to traces

Look at steering, line and throttle timing against speed and G force changes.

Pause often

Short stop-start review is usually more useful than trying to watch a whole lap continuously.

Help Videos

This section is ready for future walkthrough videos. Good first candidates would be:

  • How to enable SessT in Race Studio 3
  • How to choose the OCR region correctly
  • How to set the first sync point
  • Basic lap analysis workflow

Recommendation: short videos of 30 to 90 seconds each will likely be more useful than one long tutorial.

Contact Support

If you’re stuck or something isn’t working as expected, feel free to get in touch.

Email: support@rs3sync.com

Include a short description of the issue and what you were trying to do — this helps resolve problems much faster.